

The Ultimate Guide to Growing Your Own Makataan from Homegrown Seeds
- Angela Bruce

- Apr 25
- 4 min read
Growing your own makataan from homegrown seeds is a rewarding experience that connects you to nature and provides fresh, healthy produce right from your garden. Whether you are a seasoned gardener or a beginner, this guide will walk you through every step needed to successfully cultivate makataan at home. You will learn how to prepare your seeds, choose the right soil, care for your plants, and harvest your crop.
Makataan is a versatile plant that thrives in various climates and soil types, making it an excellent choice for home gardeners. By starting from seeds, you ensure the purity and quality of your plants, and you can enjoy the satisfaction of nurturing them from the very beginning.

Preparing Your Makataan Seeds for Planting
Starting with healthy seeds is crucial for a strong and productive makataan plant. Here are the steps to prepare your seeds:
Select quality seeds: Choose seeds that are firm, plump, and free from cracks or discoloration. If you have seeds from a previous harvest, ensure they are stored in a cool, dry place.
Soak the seeds: Soaking seeds in warm water for 12 to 24 hours softens the seed coat and speeds up germination. Use clean water and avoid soaking for too long to prevent seed rot.
Pre-germination: For better results, place soaked seeds between moist paper towels in a warm area. Check daily and plant the seeds as soon as you see small sprouts.
By taking these steps, you give your makataan seeds the best chance to sprout quickly and grow into healthy plants.
Choosing the Right Soil and Location
Makataan grows best in well-drained, fertile soil with a neutral to slightly acidic pH (around 6.0 to 7.0). Here’s how to prepare the soil and select the ideal spot:
Soil preparation: Loosen the soil to a depth of 12 inches and mix in organic compost or well-rotted manure to improve fertility and drainage.
Sunlight: Makataan requires full sun for at least 6 hours a day. Choose a location that receives ample sunlight but is protected from strong winds.
Spacing: When planting seeds or seedlings, space them about 12 to 18 inches apart to allow room for growth and airflow.
Good soil and proper location set the foundation for healthy makataan plants that resist disease and produce abundant leaves.
Planting Your Makataan Seeds

Planting makataan seeds correctly ensures strong germination and growth. Follow these steps:
Planting depth: Sow seeds about 1/4 to 1/2 inch deep in the soil. Cover lightly with soil and gently pat down.
Watering: Water the soil immediately after planting to settle the seeds. Keep the soil consistently moist but not waterlogged during germination.
Germination time: Seeds typically sprout within 7 to 14 days. Avoid disturbing the soil during this period.
If you are planting in seed trays or pots, transplant seedlings to the garden once they have at least two sets of true leaves.
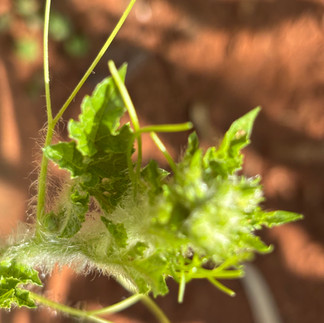
Caring for Your Growing Makataan Plants
Proper care helps makataan plants thrive and produce a healthy harvest. Focus on these key areas:
Watering: Makataan prefers regular watering to keep the soil moist. Water deeply once or twice a week, depending on rainfall and temperature.
Mulching: Apply a layer of organic mulch around the plants to retain moisture, suppress weeds, and regulate soil temperature.
Fertilizing: Use a balanced fertilizer or compost tea every 3 to 4 weeks to provide essential nutrients. Avoid over-fertilizing, which can lead to excessive leaf growth with less flavor.
Pest control: Watch for common pests like aphids and caterpillars. Use natural remedies such as neem oil or insecticidal soap to manage infestations without harming beneficial insects.
Regularly inspect your plants and remove any yellowing or damaged leaves to keep them healthy.


Harvesting and Storing Makataan
Knowing when and how to harvest makataan ensures the best flavor and quality:
Harvest time: You can start harvesting leaves once the plant reaches about 6 to 8 inches tall, usually 6 to 8 weeks after planting.
Harvest method: Pick the outer leaves first, leaving the inner leaves to continue growing. Use clean scissors or pinch leaves off gently.
Storage: Fresh makataan leaves can be stored in a plastic bag in the refrigerator for up to a week. For longer storage, blanch and freeze the leaves.
Regular harvesting encourages new growth and extends the productive life of your makataan plants.
Troubleshooting Common Issues
Even with good care, you might encounter some challenges. Here are solutions to common problems:
Poor germination: Check seed freshness and soil moisture. Avoid planting too deep or in cold soil.
Yellow leaves: This may indicate overwatering, poor drainage, or nutrient deficiency. Adjust watering and add compost or fertilizer.
Pests: Use natural pest control methods and encourage beneficial insects like ladybugs.
Slow growth: Ensure your plants get enough sunlight and nutrients. Thin overcrowded seedlings to improve airflow.
By addressing these issues early, you keep your makataan plants healthy and productive.
Uses of Makataan Fruit
Makataan is incredibly versatile, especially in traditional and homestead living.
1. Preserves & Jams
The most popular use!Makataan fruit is often used to make sweet preserves, where the flesh absorbs syrup beautifully, creating a firm, translucent texture.
2. Candied Fruit
The fruit can be slowly cooked in sugar syrup and dried to create candied makataan, a delicious treat or baking ingredient.
3. Syrup Infusions
The fruit is sometimes soaked or cooked in flavored syrups (like ginger or citrus), making a unique addition to desserts.
4. Animal Feed
Traditionally, makataan is used as a nutritious feed for livestock, especially in dry areas where other crops may struggle.
5. Seed Saving & Propagation
Each fruit contains valuable seeds that allow you to continue your growing cycle year after year—a true homestead treasure.
6. Drought-Resilient Crop
Even when not used directly in the kitchen, makataan plays an important role as a reliable, low-maintenance crop in sustainable gardening systems.

From seed to harvest, you are nurturing not just a plant—but a lifestyle rooted in tradition, resilience, and creativity.

© 2024–2026 My Creative LifeStyle. A space for creativity, inspiration, and
handmade living. All content is protected and lovingly created, please do
not copy without permission.


Comments