

How to Make Chocolate from Scratch with Cocoa Butter and Cocoa Powder


There is something deeply satisfying about making food from its most basic ingredients. I make preserves, dehydrate fruit, bake, and experiment with all sorts of homemade staples, but making my own chocolate from cocoa butter and cocoa powder was completely new territory.
Usually, when people talk about homemade chocolates, they start with a slab of ready-made chocolate. They melt it, pour it into moulds, add fillings or toppings, and call it homemade.
This time, I wanted to go further back.
I wanted to know whether I could make actual chocolate myself, starting with separate ingredients: cocoa butter, cocoa powder, honey, a little lecithin, salt, and some chocolate moulds.
The short answer is yes. And for a first attempt, I was rather pleased with the result.

What I used to make my first batch of chocolate
At its simplest, chocolate does not need a long ingredient list. For my first batch, I used:
Ingredient | Amount |
Cocoa butter | 220 g |
Good-quality unsweetened cocoa powder | 145 g |
Honey | 30 g |
Soy lecithin | 2 g |
Salt | A small pinch |
Vanilla | A little, if desired |
This quantity gave me about four large chocolate bars, though the final number will depend on the size of your moulds.
I specifically wanted to try making chocolate with honey rather than refined sugar. The result was a rich, dark chocolate that was not overly sweet. It had that slightly grown-up bitterness you expect from dark chocolate, with just enough honey in the background to soften the edges.
This is not bean-to-bar chocolate in the strictest sense, because I did not start with whole cacao beans. Still, making chocolate from cocoa butter and cocoa powder feels much closer to “from scratch” than melting down a finished bar.
What cocoa butter actually is
Before this experiment, I do not think I had ever paid enough attention to cocoa butter as an ingredient.
Despite the name, cocoa butter is not dairy butter. It is the natural fat extracted from cacao beans. It is firm at room temperature, pale yellow in colour, and has a gentle chocolate aroma. When you warm it slowly, it melts into a clear golden liquid.
That fat is one of the reasons chocolate melts so beautifully in your mouth. Cocoa powder brings the deep chocolate flavour and colour. Cocoa butter brings the richness, smoothness, and structure.
Seeing those two ingredients come together was the most satisfying part of the process. The cocoa butter melted first, then the cocoa powder disappeared into it, and suddenly the mixture looked and smelled like real chocolate.
Not chocolate-flavoured icing. Not cocoa sauce. Actual chocolate.
A quick note before you start
Chocolate can be a little fussy. It does not like moisture, high heat, or rough handling.
If you are making this for the first time, keep your expectations realistic. Homemade chocolate made with cocoa powder will not be identical to expensive commercial chocolate. Commercial makers use specialist grinders and conching machines to make chocolate incredibly smooth.
A home version can still be delicious, but it may have a slightly more rustic texture. That is not failure. It is part of the experiment.
A few things help:
Use good-quality cocoa powder, because it carries most of the flavour.
Melt the cocoa butter gently, rather than heating it aggressively.
Sift the cocoa powder to avoid lumps.
Keep water away from the chocolate mixture.
Taste and adjust, but remember that warm chocolate tastes different from set chocolate.
If you use honey, the finished chocolate may be a little softer than chocolate made with dry sugar. Honey contains moisture, while cocoa butter is fat, so it takes a bit of mixing to bring everything together.
How I made the chocolate
This was my first proper attempt, so I kept the process as simple as possible. I was not trying to master professional tempering on day one. I wanted a workable homemade chocolate that would set in moulds and taste good.
1. Prepare the moulds and ingredients
Before melting anything, I set out all the ingredients and made sure the moulds were clean and completely dry.
This matters more than it sounds. Even a small amount of water can make melted chocolate thicken or seize. Since cocoa butter melts quickly once warmed, it helps to have everything ready before you begin.
I weighed the cocoa butter, cocoa powder, honey, lecithin, and salt. I also sifted the cocoa powder, which made it much easier to mix in later.
2. Melt the cocoa butter gently
I placed the cocoa butter in a heatproof bowl over a pan of barely simmering water. You can also use a very low heat if you are careful, but indirect heat gives more control.
The aim is to melt the cocoa butter slowly. It does not need to bubble, steam, or get very hot. Once it turned into a clear golden liquid, I removed it from the heat.
This stage smells lovely. Not like a sweet chocolate bar, but like the beginning of chocolate.

I purchased this from Temu and it works well - Stainless Steel Double Boiler Set – 2L Pot with 1.1L Chocolate Melting Bowl & Silicone Spatula. Ideal for melting chocolate, cocoa butter, candy, wax and soap. Made from durable 304 stainless steel for easy and controlled double-boiler melting. - Click HERE for more information.


3. Stir in the cocoa powder
Next, I added the sifted cocoa powder gradually, stirring as I went.
The mixture darkened almost immediately. At first, it looked a little grainy, but with steady mixing it became glossy and thick. A small whisk works well here, especially if you want to break up tiny pockets of powder.
Do not rush this stage. The better the cocoa powder is mixed into the cocoa butter, the smoother the finished chocolate will be.
4. Add the honey, lecithin, salt, and vanilla
Once the cocoa powder was fully mixed in, I added the honey, soy lecithin, salt, and a small amount of vanilla.
The lecithin helps the mixture come together. It acts as an emulsifier, which is useful when combining fat-based ingredients with something like honey. You do not need much. In this batch, 2 g was enough.
Salt is just as important as the sweetener. A tiny pinch lifts the chocolate flavour and keeps the bitterness from tasting flat.
The vanilla is optional, but I like the rounded flavour it gives. A little goes a long way.
At this point, the chocolate should look glossy and pourable. If it thickens too much, place the bowl back over gentle heat for a short time and stir until it loosens again.
Pouring and setting the chocolate
Once the mixture looked smooth, I poured it into chocolate moulds.
This is the part where it suddenly feels real. The liquid chocolate settles into the shapes, and you can already imagine the finished bars.
After filling the moulds, I tapped them gently on the counter to release air bubbles. A few bubbles still appeared on the surface, but that did not bother me. This was homemade chocolate, not a factory product.
I then left the moulds to set. You can set the chocolate in a cool room if your kitchen is not too warm. A short time in the fridge can also help, especially if the chocolate is soft, but avoid leaving it there uncovered for too long. Chocolate can pick up smells from the fridge, and condensation can affect the surface.
Once firm, the bars released from the moulds easily.

What the finished chocolate was like
The finished bars were dark, rich, and pleasantly intense. They had a deep cocoa flavour and a gentle honey note, without being sugary.

The texture was not quite the same as shop-bought chocolate. It was smooth enough to enjoy, but not perfectly silky in the way commercial chocolate can be. That makes sense, because professional chocolate is refined for a long time to reduce the particle size of the cocoa and sugar.
For a homemade version made with cocoa powder, I was genuinely happy with it.
The chocolate had a good snap after setting, though slightly less sharp than a professionally tempered bar. It melted nicely, tasted bold, and felt like a proper dark chocolate rather than a novelty recipe.
I would make it again.
What I learned from making chocolate from scratch
My biggest lesson was that chocolate is simple and complex at the same time.
The ingredient list is short. The method is not difficult. But small details affect the result.
The quality of the cocoa powder matters
Because this recipe uses cocoa powder rather than whole cacao beans, the cocoa powder carries a lot of responsibility. A flat or harsh cocoa powder will make flat or harsh chocolate.
Use one you enjoy the smell of. If it smells rich and chocolatey in the bag, it has a much better chance of tasting good in the finished bar.
Honey works, but it changes the texture
I liked the flavour of honey in the chocolate. It gave sweetness without making the bars taste too sweet.
That said, honey is not a dry sweetener. It can make the mixture behave differently from standard chocolate made with sugar. If you want a firmer, more traditional texture, you may prefer experimenting with powdered sugar instead.
For my taste, the honey version was worth it.
Lecithin helps more than I expected
The soy lecithin was only a tiny part of the recipe, but it helped the mixture blend and pour more smoothly.
You can make chocolate without it, but for this kind of recipe, I would use it again. It made the process feel more forgiving.
Tempering is the next challenge
This first batch was about learning the basics, not perfecting tempering.
Tempering is the process of controlling the cocoa butter crystals so finished chocolate sets with a glossy finish, firm snap, and better stability at room temperature. It is one of those skills that sounds intimidating until you try it a few times.
For a first batch, I did not worry too much. Next time, I would like to experiment more carefully with temperatures and see how much the finish improves.
Ideas for flavour variations
Once the basic chocolate works, it opens the door to plenty of variations. The key is to avoid adding watery ingredients, because water can affect the texture.
Good additions include:
Toasted chopped nuts
Freeze-dried raspberries
Orange zest
Crushed coffee beans
Desiccated coconut
Chilli flakes
Cacao nibs
A little cinnamon
Flaky sea salt on top
I would add most of these directly to the moulds before pouring, or sprinkle them on top while the chocolate is still soft.
For my next batch, I am tempted by orange and sea salt. Dark chocolate seems made for both.
I used these moulds from Temu - 15-Piece Silicone Chocolate Bar Mould
A flexible, food-grade silicone mould that I used to make my homemade chocolate bars. The 15-piece segmented design creates a traditional break-apart chocolate bar. It is heat-resistant, reusable, easy to clean and flexible, making it easy to release the chocolate once set. Click HERE for more information.


Chocolate Moulds 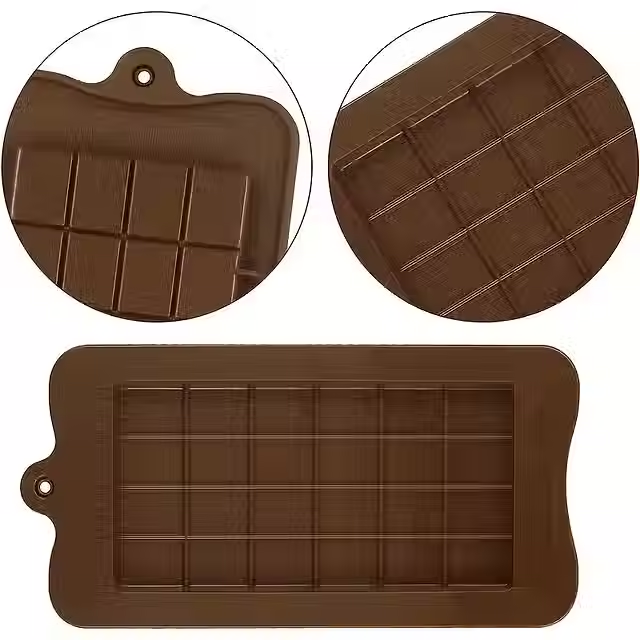
Would I change anything next time?
Yes, but not because the first batch failed.
Next time, I would try grinding the mixture for longer to improve the texture. A small melanger is the traditional tool for this, but not everyone has one at home. Even extra whisking and careful sifting can help a little.
I would also test a slightly different sweetness level. The 30 g of honey made a dark, not-too-sweet chocolate. That suited me, but anyone who prefers a milder bar might want to add a little more sweetener.
I would keep the salt, vanilla, and lecithin. They all earned their place.
Most of all, I would make the batch with a bit more confidence. The first time, I kept wondering whether it would set, whether the honey would mix in, and whether the final bars would taste like chocolate at all.
They did.
Final thoughts on homemade chocolate
Making chocolate from cocoa butter and cocoa powder is a lovely kitchen experiment. It is simple enough to try on an ordinary afternoon, but interesting enough to make you appreciate chocolate in a new way.
There is something special about watching pale cocoa butter melt, stirring in dark cocoa powder, and seeing the mixture turn glossy and rich. It makes chocolate feel less like a finished product from a shelf and more like something you can understand with your hands.
My first batch was dark, rich, lightly sweetened with honey, and very satisfying to unmould. It was not perfect, but it was real chocolate, made from basic ingredients in my own kitchen.
And that alone makes it worth trying again.
Much Love Angela from My Creative LifeStyle


Comments